After installing a minimal version of CentOS 8, you will need to setup the network interface in your system so you can communicate with other systems.
By default, the network interface is disabled in the minimal version of CentOS 8.
In this tutorial, we will show you how to setup a Static IP address and Dynamic IP address using command-line and GUI mode in CentOS 8.
Getting Started
Before starting, you will need to check whether your Network service is running or not.
Check Status of Network on CentOS
You can verify it with the following command:
systemctl status NetworkManager
You should see the following output:
● NetworkManager.service - Network Manager

Loaded: loaded (/usr/lib/systemd/system/NetworkManager.service; enabled; vendor preset: enabled)

Active: active (running) since Wed 2020-02-19 08:20:31 EST; 19h ago

Docs: man:NetworkManager(8)

Main PID: 568 (NetworkManager)

Tasks: 3 (limit: 12558)

Memory: 12.4M

CGroup: /system.slice/NetworkManager.service

└─568 /usr/sbin/NetworkManager --no-daemon

Feb 20 03:38:46 centos8 NetworkManager[568]: [1582187926.1438] hostname: hostname changed from "newcentos8" to "centos8"

Feb 20 03:38:46 centos8 NetworkManager[568]: [1582187926.1440] policy: set-hostname: current hostname was changed outside NetworkManag>

Feb 20 03:38:46 centos8 NetworkManager[568]: [1582187926.1440] policy: set-hostname: set hostname to 'centos8' (from system configurat>

Feb 20 03:39:21 centos8 NetworkManager[568]: [1582187961.7263] dhcp4 (eth1): canceled DHCP transaction

Feb 20 03:39:21 centos8 NetworkManager[568]: [1582187961.7263] dhcp4 (eth1): state changed timeout -> done

Feb 20 03:39:21 centos8 NetworkManager[568]: [1582187961.7268] device (eth1): state change: ip-config -> failed (reason 'ip-config-una>

Feb 20 03:39:21 centos8 NetworkManager[568]: [1582187961.7280] device (eth1): Activation: failed for connection 'System eth1'

Feb 20 03:39:21 centos8 NetworkManager[568]: [1582187961.7285] device (eth1): state change: failed -> disconnected (reason 'none', sys>

lines 1-20/20 (END)
Check which Network Interfaces/Cards Installed
Next, you will need to check the list of ethernet cards installed in your system.
You can do it by running the following command:
nmcli d
You should see the following output:
DEVICE  TYPE      STATE      CONNECTION

eth0    ethernet  disconnected  System eth0

eth1    ethernet  disconnected  System eth1

lo      loopback  unmanaged  --
Next, it is recommended to install some basic system utilities to perform day-to-day system administration tasks.
You can install them with the following command:
yum install nano wget net-tools -y
Once all the packages are installed, you can proceed to the next step. (If wget doesn’t work, please see our wget tutorial to ensure you have it installed)
Setup Static IP Address (Gui & Command line)
In this section, we will learn how to setup static IP address with GUI mode and Command-line mode.
Setup Static IP Address in GUI Mode
Open your terminal interface and run the following command to configure a network interface:
nmtui-edit
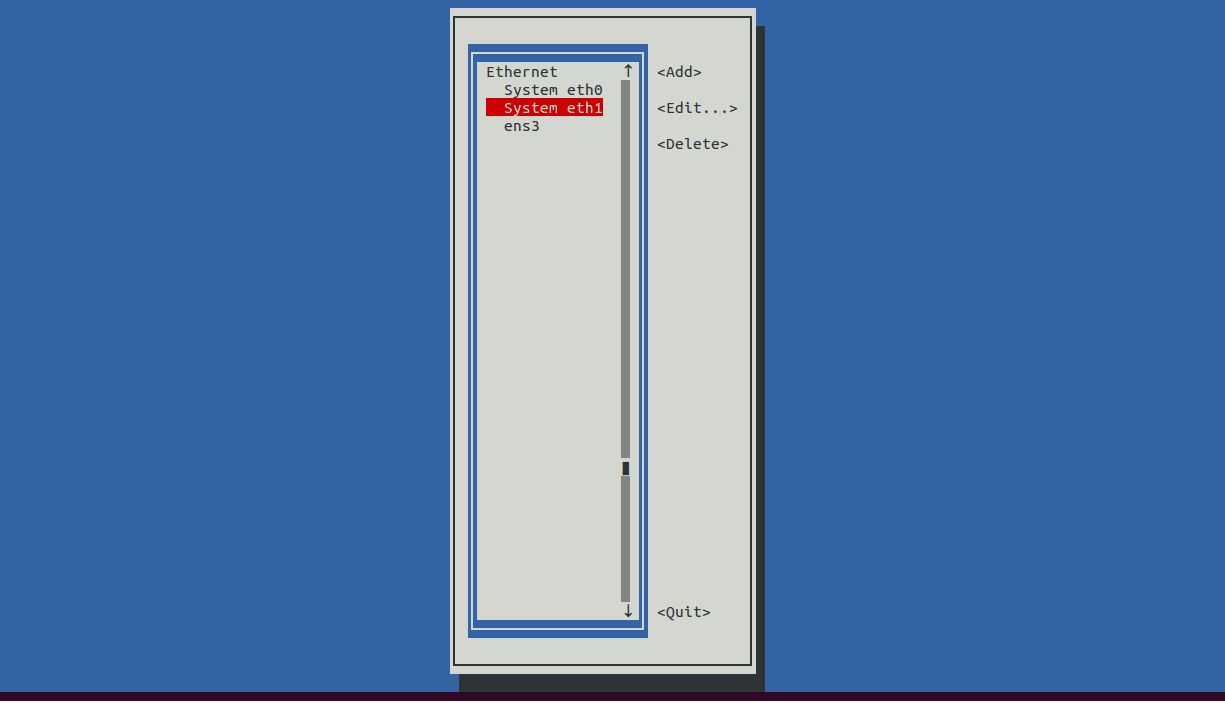
You should see the following screen:

Here, you can select the network interface that you want to configure.
Select System eth1 interface and click on the Edit button.
You should see the following screen:
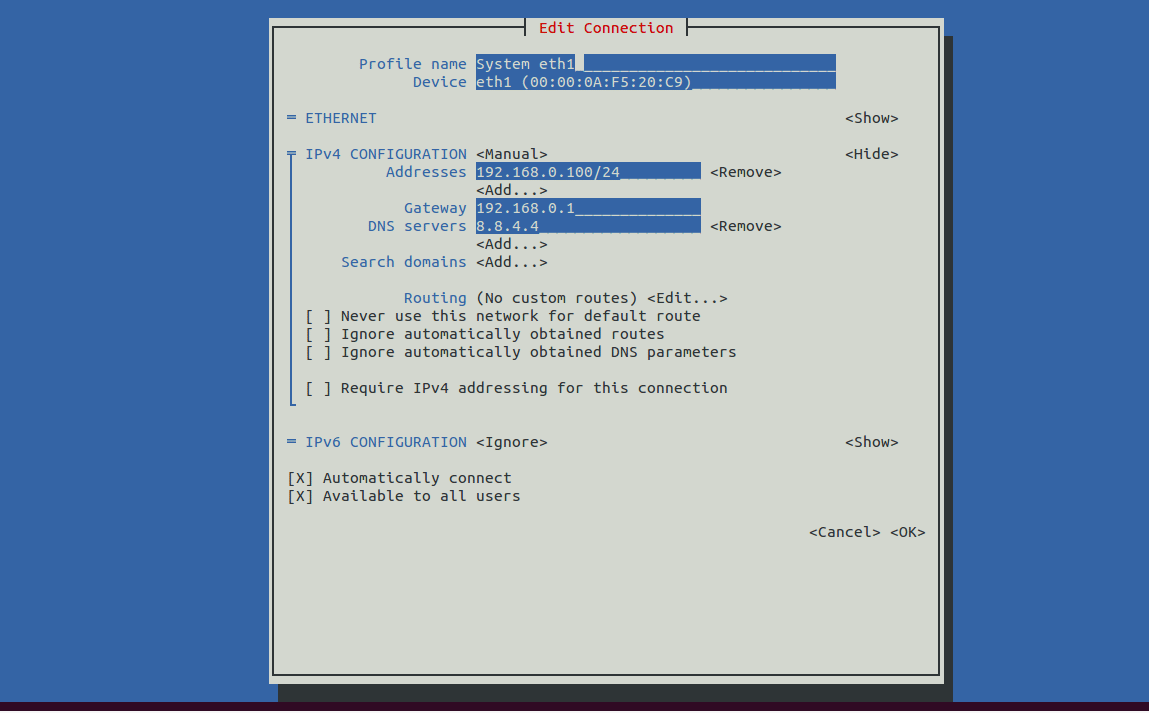
- Change IPv4 CONFIGURATION to Manual (as seen in the above screenshot)
- Set your desired IP address,
- Gateway,
- DNS Servers
Then click on the OK button to save the configuration.
Next, click on the Quit button to exit from the GUI mode.
Apply Network Settings Command
Next, run the following command to apply the new network settings:
nmtui-connect
You should see the following screen:
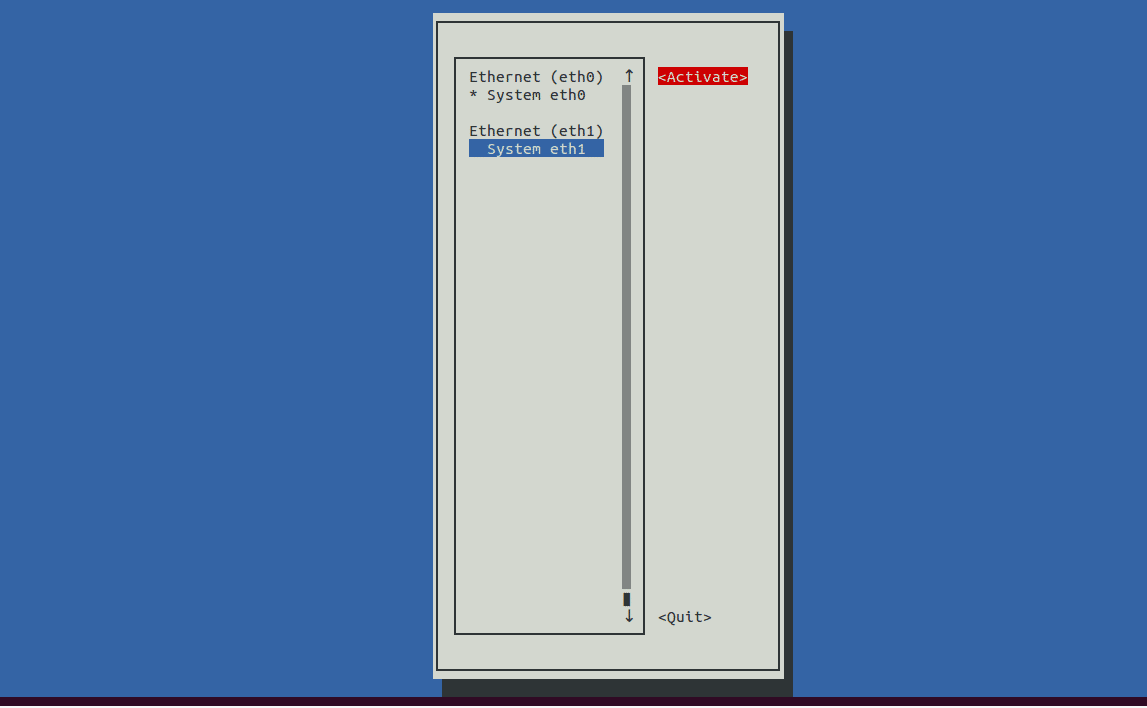
Here you will select your network interface and click on the Activate button to enable the network interface.
Next you will click on the Quit button to exit from the GUI mode.
Verify Network Settings Command
Next, you can verify the network configuration settings with the following command:
ifconfig eth1
You should see the following output:
eth1: flags=4163<UP,BROADCAST,RUNNING,MULTICAST>  mtu 1500

inet 192.168.0.100  netmask 255.255.255.0  broadcast 192.168.0.255

inet6 fe80::200:aff:fef5:20c9  prefixlen 64  scopeid 0x20

ether 00:00:0a:f5:20:c9  txqueuelen 1000  (Ethernet)

RX packets 1501466  bytes 120677632 (115.0 MiB)

RX errors 0  dropped 0  overruns 0  frame 0

TX packets 44  bytes 3188 (3.1 KiB)

TX errors 0  dropped 0 overruns 0  carrier 0  collisions 0

Setup Static IP Address with Command-line Mode
You can also setup the static IP address via your Command-line.
By default, all network configuration files are located inside /etc/sysconfig/network-scripts/ directory.
You can setup static IP address by editing the file:
/etc/sysconfig/network-scripts/ifcfg-eth1
Run the command below to open this file in Nano editor:
nano /etc/sysconfig/network-scripts/ifcfg-eth1
You should see the following configuration:
DEVICE=eth1

BOOTPROTO=static

HWADDR=00:00:0A:F5:20:C9

ONBOOT=yes

TYPE=Ethernet

PROXY_METHOD=none

BROWSER_ONLY=no

IPADDR=192.168.0.100

PREFIX=24

GATEWAY=192.168.0.1

DNS1=8.8.4.4

DEFROUTE=yes

IPV4_FAILURE_FATAL=no

IPV6INIT=no

NAME="System eth1"

UUID=9c92fad9-6ecb-3e6c-eb4d-8a47c6f50c04
Here, you can change the IPADDR, GATEWAY and DNS1 with your desired values.
Save and Quit the file to ensure your settings are saved!
Next, you will need to run the following command to apply the new configuration changes:
nmcli connection down eth1

nmcli connection up eth1
These commands bring the eth1 interface down and back up to apply the settings.
Next, run the following command to verify the IP has changed:
ifconfig eth1
Setup Dynamic IP Address
In this section, we will learn how to setup a dynamic IP address with GUI and Command-line mode.
Setup Dynamic IP Address with GUI Mode
To setup the dynamic IP address, open your terminal and run the following command to edit the network configuration:
nmtui-edit
You should see the following screen:
Select the network interface that you want to configure and click on the Edit button.
You should see the following screen:

Change the IPv4 CONFIGURATION to Automatic and click on the OK button to save the settings.
Then click on the QUIT button to exit from the GUI mode.
Apply Dynamic IP Settings Command
Next, run the following command to apply the new network settings:
nmtui-connect
You should see the following screen:

Here you will select your network interface and click on the Activate button to enable the network interface.
Next, click on the Quit button to exit from the GUI mode.
Next, you can verify the network configuration settings with the following command:
ifconfig eth1
You should see the following output:
eth1: flags=4163<UP,BROADCAST,RUNNING,MULTICAST>  mtu 1500

inet 192.168.0.123  netmask 255.255.255.0  broadcast 192.168.0.255

inet6 fe80::200:aff:fef5:20c9  prefixlen 64  scopeid 0x20

ether 00:00:0a:f5:20:c9  txqueuelen 1000  (Ethernet)

RX packets 1501466  bytes 120677632 (115.0 MiB)

RX errors 0  dropped 0  overruns 0  frame 0

TX packets 44  bytes 3188 (3.1 KiB)

TX errors 0  dropped 0 overruns 0  carrier 0  collisions 0
Setup Dynamic Address with Command-line Mode
You can setup the dynamic IP address by editing the file /etc/sysconfig/network-scripts/ifcfg-eth1 as shown below:
nano /etc/sysconfig/network-scripts/ifcfg-eth1
You should see the following configuration:
DEVICE=eth1

BOOTPROTO=DHCP

HWADDR=00:00:0A:F5:20:C9

ONBOOT=yes

TYPE=Ethernet

PROXY_METHOD=none

BROWSER_ONLY=no

DEFROUTE=yes

IPV4_FAILURE_FATAL=no

IPV6INIT=no

NAME="System eth1"

UUID=9c92fad9-6ecb-3e6c-eb4d-8a47c6f50c04
Here, you will need to change these lines:
BOOTPROTO=DHCP
ONBOOT=yes
Save and close the file when you are finished.
Then run the following command to apply the new configuration changes:
nmcli connection down eth1

nmcli connection up eth1
Next, run the following command to verify the IP has changed:
ifconfig eth1
Setup Hostname
You can setup the hostname of your system with GUI mode or Command-line mode as well.
GUI Mode Host Name Setup:
To setup the hostname with GUI mode, run the following command:
nmtui-hostname
You should see the following screen:
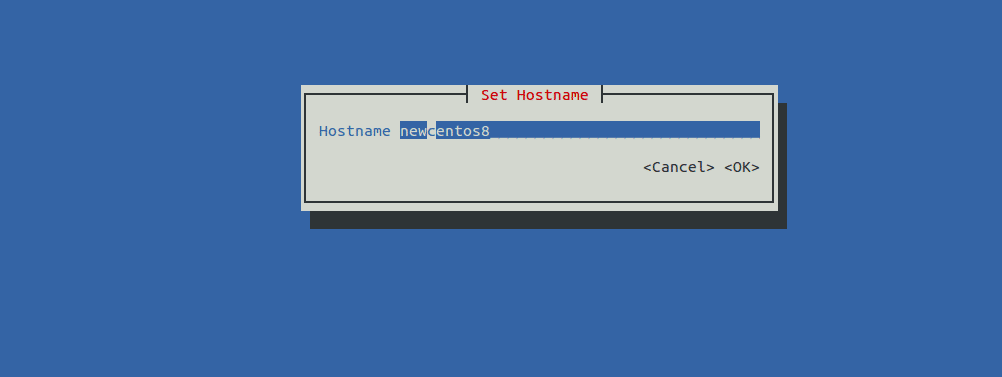
Here you will provide your desired host name and click on the OK button.
You will be asked for confirmation as shown below:
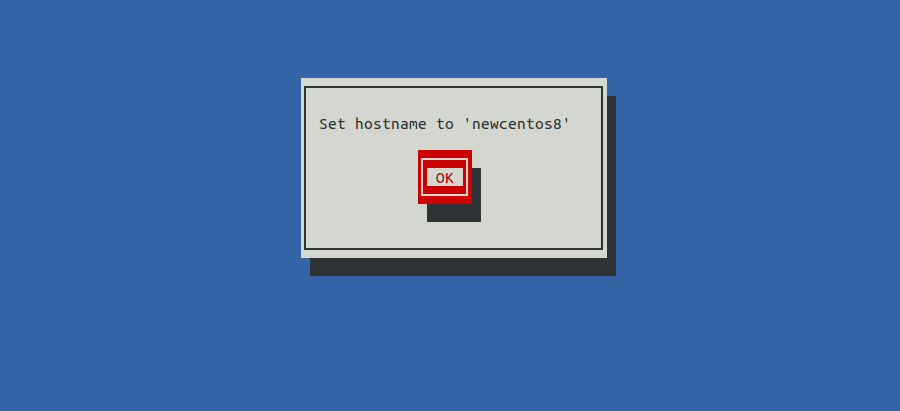
Click on the OK button to save the changes.
Next, you can verify your hostname with the following command:
hostname
You should see your new hostname in the following output:
newcentos8
Setup Host Name via Command Line:
To setup the hostname with Command-line mode, run the following command:
hostnamectl set-hostname centos8
Next, you can verify your hostname with the following command:
hostname
You should see your new hostname in the following output:
centos8
Conclusion
In the above guide and tutorial, we’ve learned how to setup the network interface in CentOS 8 with GUI and Command mode along with the Host name of your system.
We hope you have now enough knowledge to setup the network interface and please feel free to ask any questions below in the comments.