When you are working on the multiple servers, copying files between two servers is a common task for any system administrator. In this case, the SCP utility is the best choice for any system administrator.
SCP stands for “Secure Copy Protocol” is a Linux command-line tool used to transfer files and directories securely between two servers.
By default, GUI mode is not installed in Linux servers. SCP utility makes it easier for Linux system administrator to manage the multiple servers from the command-line.
SCP utility is based on the SSH, as so you will need a username and password of the source and target system to transfer the files.
In this tutorial, we will show you how to transfer files and directories between two systems using SCP file transfers!
Basic Syntax
The basic syntax of the scp command is shown below:
scp [OPTION] local-file-or-directory user@remote-ip:/directory/
You can use the above command to transfer files and directories from a local system to remote system.
scp [OPTION] user@remote-ip:/remote-file /local-directory
You can use the above command to transfer files and directories from a remote system to local system.
scp [OPTION] user@remote-ip:/directory/ user@remote-ip:/directory/
You can use the above command to transfer files and directories from one remote system to another remote system.
A brief explanation of each option in SCP command are shown below:
*Note: all these options are Case sensitive!
- -r
This option will copy files and directories recursively. - -v
This option will display verbose output during the copying process. - -P
This option is used to specify the ssh port number of the target host when the target host using the different SSH port. - -l
This option is used to limit the bandwidth while copying the files and directories. - -q
This option skips the SSH warning message. - -p
This option will preserve permissions, modes and access time of files while copying. - -i
This option is used to specify the SSH private key.
Transfer Files and Directories with SCP in Linux
The SCP utility allows you to transfer files between, local to remote, remote to local and remote to remote systems.
In this section we will show you how to transfer files and directories between them.
Local to Remote System Transfers:
Local to Remote File Transfers:
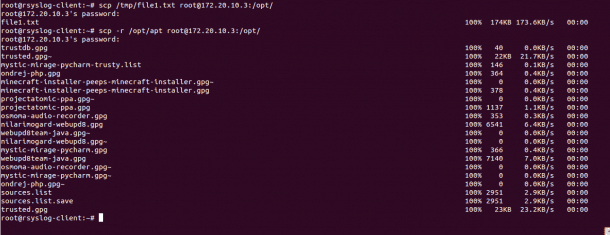
To transfer a file named file1.txt located inside /tmp directory from a local system to the remote system directory /opt use the following command:
scp /tmp/file1.txt root@172.20.10.3:/opt/
You will be asked to provide remote system’s root user password to transfer the file as shown below:
root@172.20.10.3's password:

file1.txt                                                                                                    100%  174KB 173.6KB/s   00:00
You can use the option -v with SCP to see the verbose output during the file transfer:
scp -v /tmp/file1.txt root@172.20.10.3:/opt/
Local to Remote Directories/Folders Transfers:
To transfer a directory named apt located inside /opt from a local system to the remote system directory /opt recursively use the following command:
scp -r /opt/apt root@172.20.10.3:/opt/
Provide remote system’s root user password to transfer the directory as shown below:
trustdb.gpg                                                                                                  100%   40     0.0KB/s   00:00

trusted.gpg~                                                                                                 100%   22KB  21.7KB/s   00:00

mystic-mirage-pycharm-trusty.list                                                                            100%  146     0.1KB/s   00:00

ondrej-php.gpg                                                                                               100%  364     0.4KB/s   00:00

minecraft-installer-peeps-minecraft-installer.gpg~                                                           100%    0     0.0KB/s   00:00

minecraft-installer-peeps-minecraft-installer.gpg                                                            100%  378     0.4KB/s   00:00

projectatomic-ppa.gpg~                                                                                       100%    0     0.0KB/s   00:00

projectatomic-ppa.gpg                                                                                        100% 1137     1.1KB/s   00:00

osmoma-audio-recorder.gpg                                                                                    100%  353     0.3KB/s   00:00

nilarimogard-webupd8.gpg                                                                                     100% 6541     6.4KB/s   00:00

webupd8team-java.gpg~                                                                                        100%    0     0.0KB/s   00:00

nilarimogard-webupd8.gpg~                                                                                    100%    0     0.0KB/s   00:00

mystic-mirage-pycharm.gpg                                                                                    100%  366     0.4KB/s   00:00

webupd8team-java.gpg                                                                                         100% 7140     7.0KB/s   00:00

osmoma-audio-recorder.gpg~                                                                                   100%    0     0.0KB/s   00:00

mystic-mirage-pycharm.gpg~                                                                                   100%    0     0.0KB/s   00:00

ondrej-php.gpg~                                                                                              100%    0     0.0KB/s   00:00

sources.list                                                                                                 100% 2951     2.9KB/s   00:00

sources.list.save                                                                                            100% 2951     2.9KB/s   00:00

trusted.gpg                                                                                                  100%   23KB  23.2KB/s   00:00
Example:
Remote to Local Transferring:
Remote to Local File Transfers:
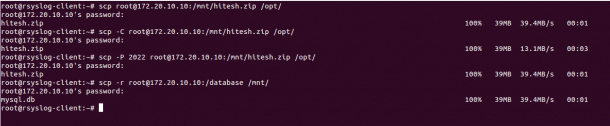
To transfer a file named hitesh.zip located inside /mnt directory of the remote to the local system’s directory /opt use the following command:
scp root@172.20.10.10:/mnt/hitesh.zip /opt/
You can increase the transfer speed by enabling the compression using the option -C with SCP as shown below:
scp -C root@172.20.10.10:/mnt/hitesh.zip /opt/
If your remote server uses SSH port 2022, then you can use -P option to specify the remote SSH port as shown below:
scp -P 2022 root@172.20.10.10:/mnt/hitesh.zip /opt/
Remote to Local Directory/Folders Transfers:
To transfer a directory named /etc from the remote system to local system’s directory /mnt recursively use the following command:
scp -r root@172.20.10.10:/database /mnt/
Example:
Remote to Remote System Transfers:
Remote to Remote File Transfers:
In order to transfer files and directories between two remote servers. You will need to configure SSH key-based authentication between both remote servers.
To transfer a file named /etc/rc.local from the one remote system (172.20.10.3) to another remote system’s (172.20.10.5) directory /opt use the following command:
scp root@172.20.10.3:/etc/rc.local root@172.20.10.5:/opt/
To transfer a directory named /mnt/apt from the one remote system (172.20.10.3) to another remote system’s (172.20.10.5) directory /opt use the following command:
scp -r root@172.20.10.3:/mnt/apt root@172.20.10.5:/opt/

Transfer Files and Directories with SCP in Windows (7, 8, 10, and Server)
If you are working on the Windows system and want to transfer files and directories from Windows to Linux and Linux to Windows system. Then, you can achieve this using WinSCP utility.
WinSCP is a free and open-source SCP and SFTP client for Windows based operating systems.
Transfer files between Windows and Linux system follow the below steps:
1. On the windows system, launch the WinSCP utility as shown below:
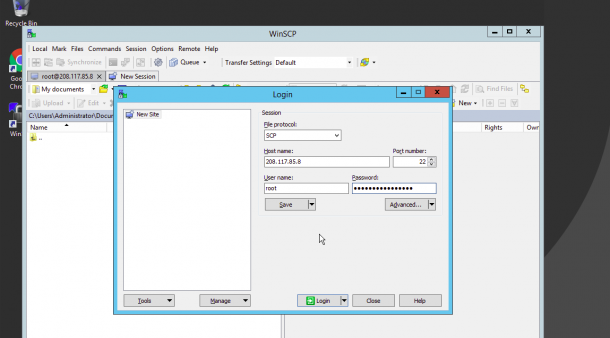
Now provide the following information:
- File Protocol : Select SCP as file transfer protocol.
- Host name : Provide your Linux server IP address.
- Port number : Provide your Linux server SSH port.
- User name : Provide the user name of your Linux server.
- Password : Provide your user’s password.
2. Now click on the Login button. You should see the following page:
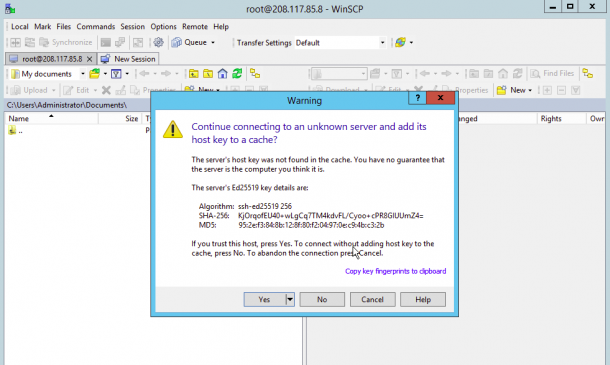
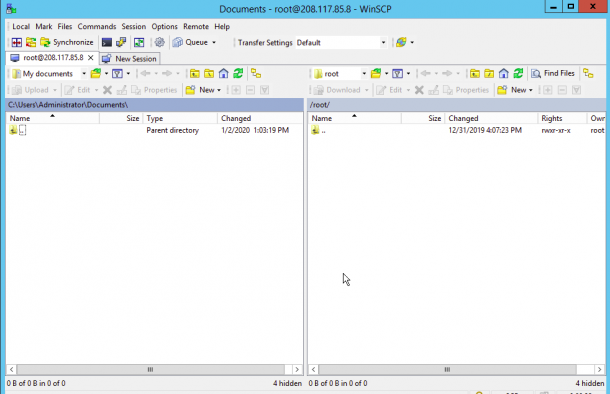
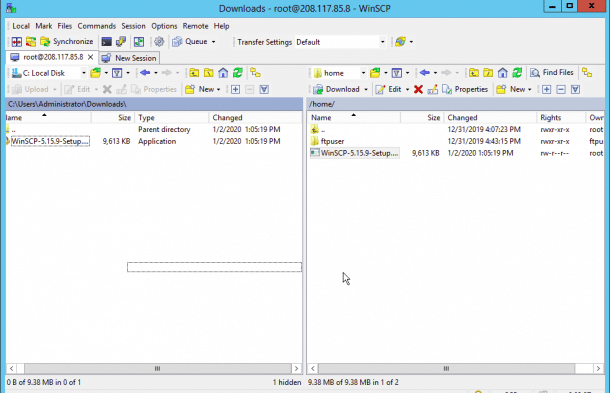
Click on the Yes button to verify the host. Once you are connected to the Linux server, you should see the following page:
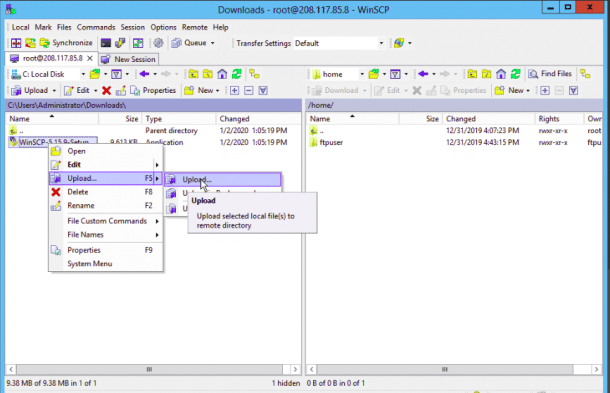
On the left pane, right-click on the file you want to upload on the Linux server and click on the Upload button as shown below:
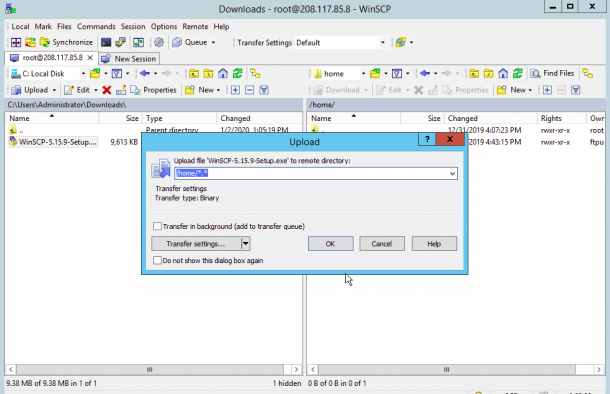
Now, provide the path of the Linux server’s directory and click on the OK button. Once the file has been uploaded, you should see the following page:
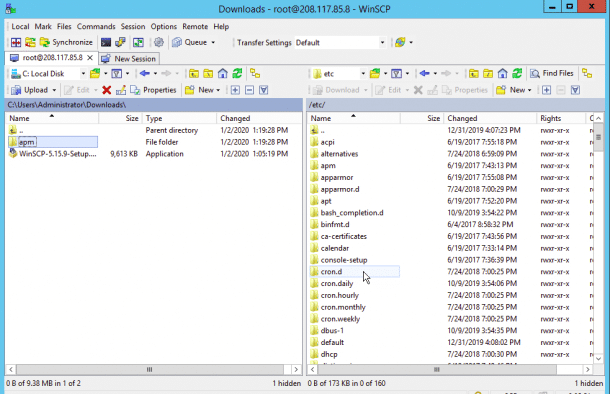
3. On the right pane, right-click on the directory you want to download from the Linux server to the Windows system and click on the Download button as shown below:


Now, provide the path of the Windows system directory and click on the OK button. Once the file has been uploaded, you should see the following page.
Conclusion
In the above tutorial, we’ve learned how to transfer files and directories from Linux to Linux, Windows to Linux and Linux to Windows. Feel free to ask questions below in the comments section if you have any!