
Odoo is a free, open source and one of the most popular business management platform written in the Python programming language.
It is an Open ERP and customer relationship software that can be used to organize and grow your business.
It comes with wide range of applications like, website, e-Commerce, billing, accounting, manufacturing, warehouse, project management and much more.
You can also install multiple instance of Odoo in the single host system.
In this tutorial, we will explain how to install and configure Odoo 12 on Ubuntu 18.04 server.
Requirements
- A server running Ubuntu 18.04.
- A static IP address is configured on your server.
- A root password is set up on your server.
Getting Started
First, it is recommended to update your system with latest version. You can do it with the following command:
apt-get update -y

apt-get upgrade -y
Once your system is updated, restart the system to apply all the changes:
Next, you will need to install some packages required by Odoo to your server.
You can install all of them by running the following command:
apt install git python3-pip build-essential wget python3-dev python3-venv python3-wheel libxslt-dev libzip-dev libldap2-dev libsasl2-dev python3-setuptools node-less -y
Once all the packages are installed, you can proceed to the next step.
Install and Configure PostgreSQL
Before installing PostgreSQL, you will need to create a new system user for Odoo. You can do it with the following command:
useradd -m -d /opt/odoo12 -U -r -s /bin/bash odoo12
Next, install PostgreSQL with the following command:
apt-get install postgresql -y
Once the installation is completed, you can check the status of PostgreSQL with the following command:
systemctl status postgresql
You should see the following output:
● postgresql.service - PostgreSQL RDBMS

Loaded: loaded (/lib/systemd/system/postgresql.service; enabled; vendor preset: enabled)

Active: active (exited) since Sat 2019-06-01 13:53:45 UTC; 30min ago

Main PID: 10385 (code=exited, status=0/SUCCESS)

Tasks: 0 (limit: 1718)

CGroup: /system.slice/postgresql.service

Jun 01 13:53:45 ubuntu1804 systemd[1]: Starting PostgreSQL RDBMS...

Jun 01 13:53:45 ubuntu1804 systemd[1]: Started PostgreSQL RDBMS.
Next, you will need to create a new PostgreSQL for Odoo. You can create it with the following command:
su - postgres -c "createuser -s odoo12"
Next, you will also need to install wkhtmltox package to render HTML into PDF and various image formats.
First, download the package with the following WGET command:
wget https://builds.wkhtmltopdf.org/0.12.1.3/wkhtmltox_0.12.1.3-1~bionic_amd64.deb
Next, install the downloaded package with the following command:
dpkg -i wkhtmltox_0.12.1.3-1~bionic_amd64.deb

apt-get install -f
Install and Configure Odoo
First, you will need to download the latest version of Odoo from the Git repository. You can do it with the following command:
su - odoo12

git clone https://www.github.com/odoo/odoo --depth 1 --branch 12.0 /opt/odoo12/odoo
After downloading Odoo, create a new Python virtual environment for the Odoo 12 installation with the following command:
cd /opt/odoo12

python3 -m venv odoo-venv
Next, activate the environment with the following command:
source odoo-venv/bin/activate
Next, install all the required packages with the following command:
pip3 install wheel

pip3 install -r odoo/requirements.txt
Next, disconnect from the environment with the following command:
deactivate
Next, you will need to create a new directory for the custom addons. You can do it with the following command:
mkdir /opt/odoo12/odoo-custom-addons
Next, exit from the Odoo12 user with the following command:
exit
Next, copy the sample odoo12 configuration file with the following command:
cp /opt/odoo12/odoo/debian/odoo.conf /etc/odoo12.conf
Next, open the /etc/odoo12.conf file with the following command:
nano /etc/odoo12.conf
Make the following changes:
[options]

; This is the password that allows database operations:

admin_passwd = admin@123

db_host = False

db_port = False

db_user = odoo12

db_password = False

addons_path = /opt/odoo12/odoo/addons,/opt/odoo12/odoo-custom-addons
Save and close the file, when you are finished.
Next, you will need to create a systemd file for Odoo to manage the Odoo service. You can do this with the following command:
nano /etc/systemd/system/odoo12.service
Add the following lines:
[Unit]

Description=Odoo12

Requires=postgresql.service

After=network.target postgresql.service

[Service]

Type=simple

SyslogIdentifier=odoo12

PermissionsStartOnly=true

User=odoo12

Group=odoo12

ExecStart=/opt/odoo12/odoo-venv/bin/python3 /opt/odoo12/odoo/odoo-bin -c /etc/odoo12.conf

StandardOutput=journal+console

[Install]

WantedBy=multi-user.target
Save and close the file. Then, reload the systemd daemon with the following command:
systemctl daemon-reload
Next, start the Odoo service with the following command:
systemctl start odoo12
You can also check the status of Odoo service with the following command:
systemctl status odoo
You should see the following output:
● odoo.service - Odoo

Loaded: loaded (/etc/systemd/system/odoo.service; disabled; vendor preset: enabled)

Active: active (running) since Sat 2019-06-01 14:20:59 UTC; 9s ago

Main PID: 31540 (python3)

Tasks: 1 (limit: 1718)

CGroup: /system.slice/odoo.service

├─31540 /opt/odoo/odoo-venv/bin/python3 /opt/odoo/odoo/odoo-bin -c /etc/odoo.conf

└─31568 /opt/odoo/odoo-venv/bin/python3 /opt/odoo/odoo/odoo-bin -c /etc/odoo.conf

Jun 01 14:20:59 ubuntu1804 systemd[1]: Started Odoo.

Jun 01 14:21:03 ubuntu1804 odoo[31540]: 2019-06-01 14:21:03,200 31540 INFO ? odoo: Odoo version 12.0

Jun 01 14:21:03 ubuntu1804 odoo[31540]: 2019-06-01 14:21:03,240 31540 INFO ? odoo: Using configuration file at /etc/odoo.conf

Jun 01 14:21:03 ubuntu1804 odoo[31540]: 2019-06-01 14:21:03,241 31540 INFO ? odoo: addons paths: ['/opt/odoo/.local/share/Odoo/addons/12.0', '/

Jun 01 14:21:03 ubuntu1804 odoo[31540]: 2019-06-01 14:21:03,243 31540 INFO ? odoo: database: odoo@default:default

Jun 01 14:21:04 ubuntu1804 odoo[31540]: 2019-06-01 14:21:04,922 31540 INFO ? odoo.addons.base.models.ir_actions_report: Will use the Wkhtmltopd

lines 1-15/15 (END)
Odoo is now running and listening on port 8069.
Configure Nginx as a Reverse Proxy
Next, you will need to configure Nginx as a reverse proxy to access Odoo instance without specifying port number.
First, you will need to install Nginx to your server. You can install Nginx with the following command:
apt-get install nginx -y
Once the Nginx has been installed, create a new configuration file for Odoo with the following command:
nano /etc/nginx/sites-enabled/odoo.conf
Add the following lines:
server {

listen 80;

listen [::]:80;

server_name example.com;

location / {

proxy_pass http://localhost:8069/;

}

}
Save and close the file, when you are finished. Then, restart Nginx to apply all the changes with the following command:
systemctl restart nginx
Access Odoo Web Interface
Odoo is now installed and configured, it’s time to access Odoo from web interface.
Open your web browser and type the URL http://example.com. You will be redirected to the following page:
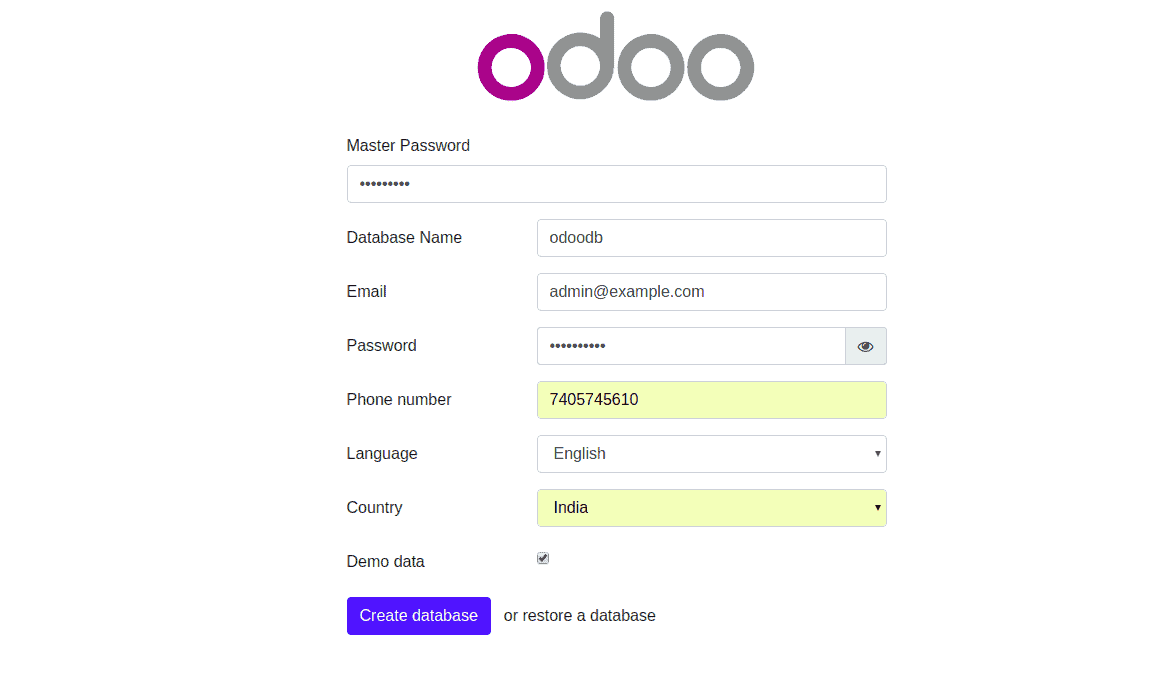
Now, provide Master password, your email and log in password, select language, select country and check Demo data. Then, click on the Create database button. Once the installation has been completed successfully. You should see the Odoo default dashboard in the following page:
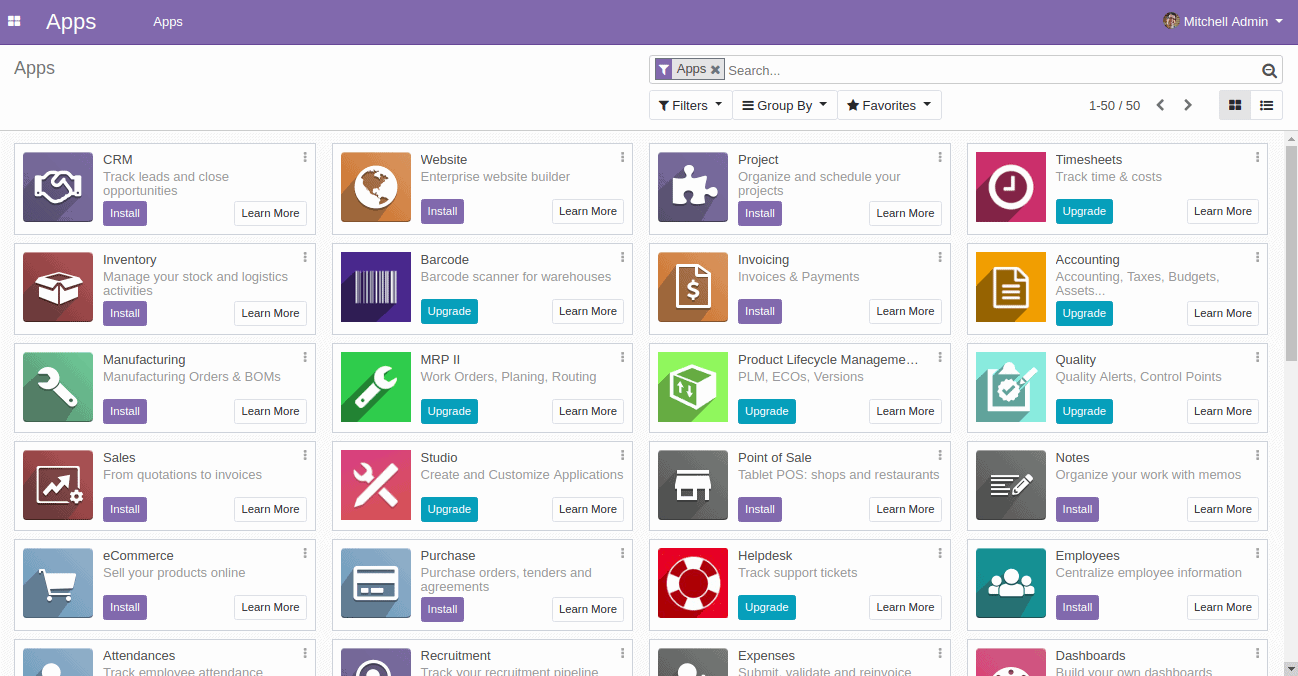
Congratulations! you have successfully installed and configured Odoo on Ubuntu 18.04 server with Nginx as a reverse proxy. You can now easily manage your bussiness using Odoo ERP from the central location.