phpMyAdmin is an open source and one of the most popular MySQL administration tools written in PHP.
It is specially designed to manage and administer MySQL databases through a graphic user interface.
You can easily create, delete, import and export database using phpMyAdmin. With phpMyAdmin, you can also set up database replication between multiple MySQL hosts easily through the web browser.
So, it very important part of any system administrator to secure phpMyAdmin from unauthorized user.
In this tutorial, we will explain how to install and secure phpMyAdmin on Ubuntu 18.04 server.
Requirements
- A server running Ubuntu 18.04.
- A root password is configured on your server.
Update the System
For security reason, it is very important to update your system with the latest stable version. You can do it with the following command:
apt-get update -y

apt-get upgrade -y
Once your system is up-to-date, restart the system to apply all the changes.
Install LAMP Server
First, you will need to install Apache, MariaDB and php to your server. You can install all of them with the following command:
apt-get install apache2 mariadb-server php php-cgi libapache2-mod-php php-common php-pear php-mbstring php-gettext -y
Once all the packages are installed, start Apache and MariaDB service and enable them to start on boot time with the following command:
systemctl start apache2

systemctl enable apache2

systemctl start mariadb

systemctl enable mariadb
Once you have done, you can proceed to the next step.
Install phpMyAdmin
By default, phpMyAdmin is not available in the Ubuntu 18.04 repository. So, you will need to add ondrej PHP repository to your system. You can add it with the following command:
apt-get install software-properties-common -y

add-apt-repository ppa:ondrej/php
Next, update the repository and install phpMyAdmin with the following command:
apt-get install phpmyadmin -y
You will need to select web server during the installation as shown below.
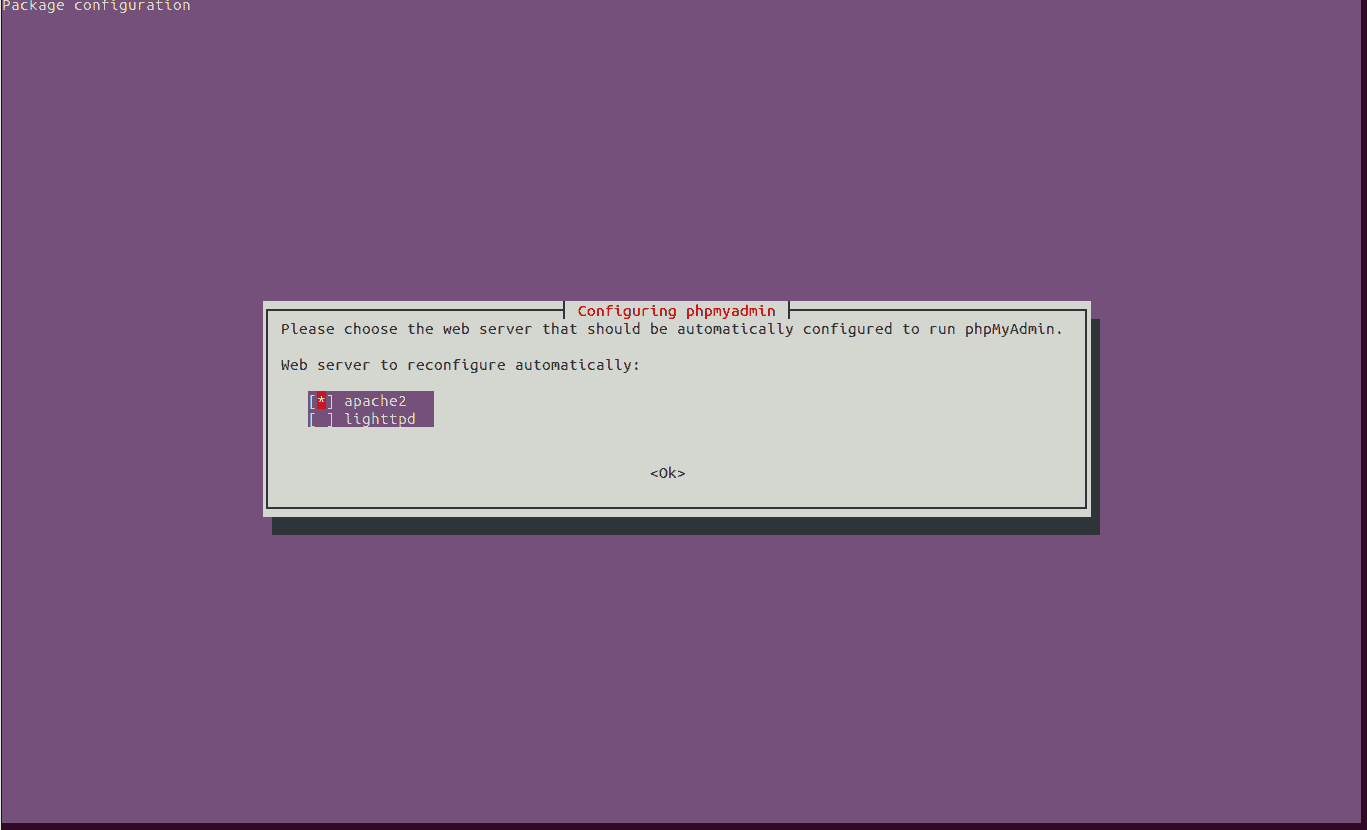
Select Apache web server and click on the OK button. You should see the following page:
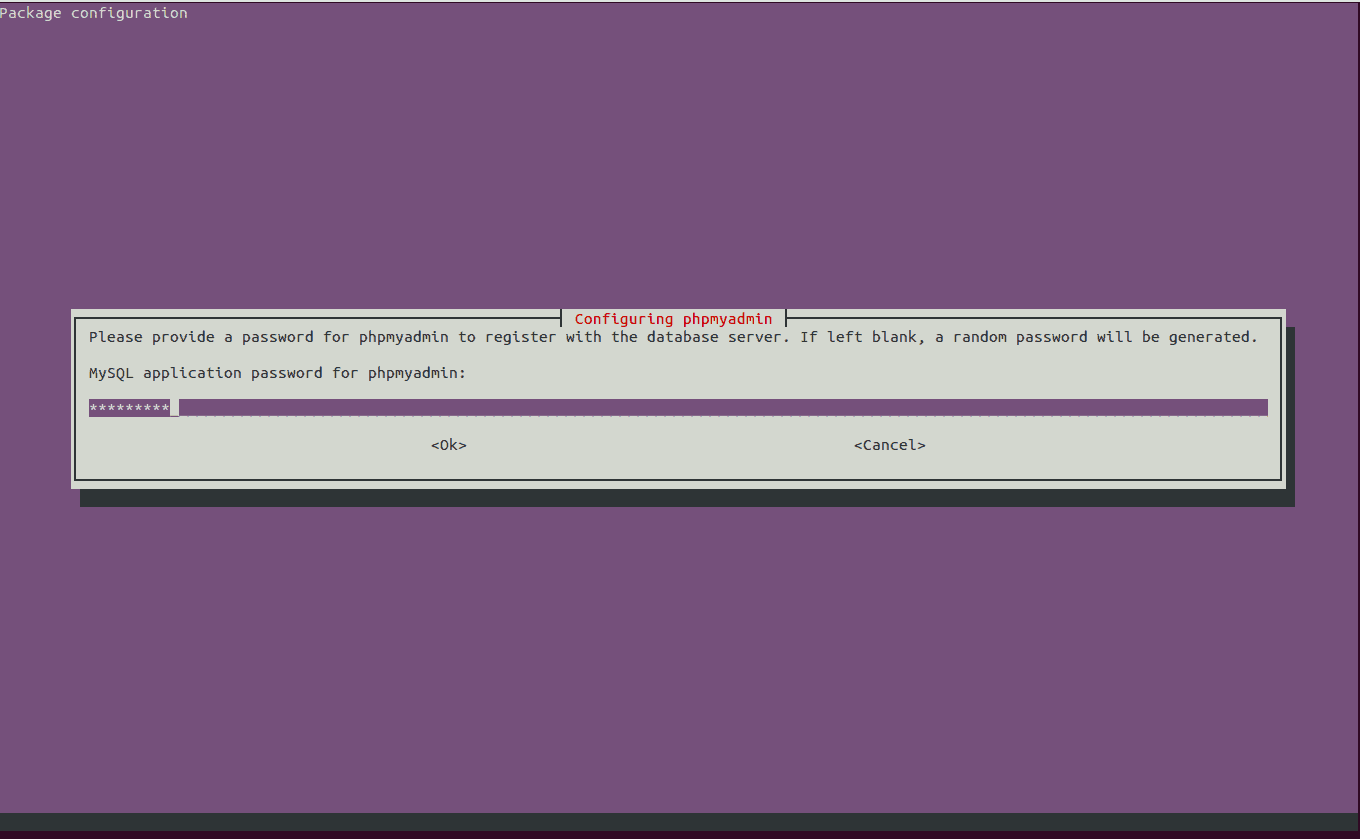
Next, provide your MySQL password and click on the OK button to start the installation.
After installing phpMyAdmin, enable the mbstring PHP extension by running the following command:
phpenmod mbstring
Next, restart Apache service to apply all the changes:
systemctl restart apache2
Setup Authentication
By default, phpmyadmin database user automatically created with the administrative password you set during installation. But, it is not a secure way. By default, the root MySQL user is set to authenticate using the auth_socket plugin in the latest version of MariaDB.
If you want to login phpMyAdmin with root user and password. Then, you will need to change its authentication method from auth_socket to mysql_native_password.
To do so, log in to MySQL shell with the following command:
mysql
Next, check the authentication method of MySQL user by running the following command:
MariaDB [(none)]>SELECT user,authentication_string,plugin,host FROM mysql.user;
You should see the authentication method used by root user in the following output:
+------------------+-------------------------------------------+-----------------------+-----------+

| user | authentication_string | plugin | host |

+------------------+-------------------------------------------+-----------------------+-----------+

| root | | auth_socket | localhost |

| mysql.session | *THISISNOTAVALIDPASSWORDTHATCANBEUSEDHERE | mysql_native_password | localhost |

| mysql.sys | *THISISNOTAVALIDPASSWORDTHATCANBEUSEDHERE | mysql_native_password | localhost |

| debian-sys-maint | *AC18DF5CAE34BF4796EF975702F038A566B48B42 | mysql_native_password | localhost |

+------------------+-------------------------------------------+-----------------------+-----------+
Now, change the authentication method from auth_socket to mysql_native_password with the following command:
MariaDB [(none)]> ALTER USER 'root'@'localhost' IDENTIFIED WITH mysql_native_password BY 'password';

MariaDB [(none)]> FLUSH PRIVILEGES;
Next, check the authentication method again by running the following command:
MariaDB [(none)]> SELECT user,authentication_string,plugin,host FROM mysql.user;
You should see the following output:
+------------------+-------------------------------------------+-----------------------+-----------+

| user | authentication_string | plugin | host |

+------------------+-------------------------------------------+-----------------------+-----------+

| root | *2470C0C06DEE42FD1618BB99005ADCA2EC9D1E19 | mysql_native_password | localhost |

| mysql.session | *THISISNOTAVALIDPASSWORDTHATCANBEUSEDHERE | mysql_native_password | localhost |

| mysql.sys | *THISISNOTAVALIDPASSWORDTHATCANBEUSEDHERE | mysql_native_password | localhost |

| debian-sys-maint | *AC18DF5CAE34BF4796EF975702F038A566B48B42 | mysql_native_password | localhost |

+------------------+-------------------------------------------+-----------------------+-----------+
Next, create a separate user for phpMyAdmin with the following command:
MariaDB [(none)]> CREATE USER 'puser'@'localhost' IDENTIFIED BY 'password';

MariaDB [(none)]> GRANT ALL PRIVILEGES ON *.* TO 'puser'@'localhost' WITH GRANT OPTION;
Next, exit from the MySQL console with the following command:
MariaDB [(none)]> EXIT;
Now, access your phpMyAdmin web interface by visiting the URL http://your-server-ip/phpmyadmin. You should see the phpMyAdmin log in page:
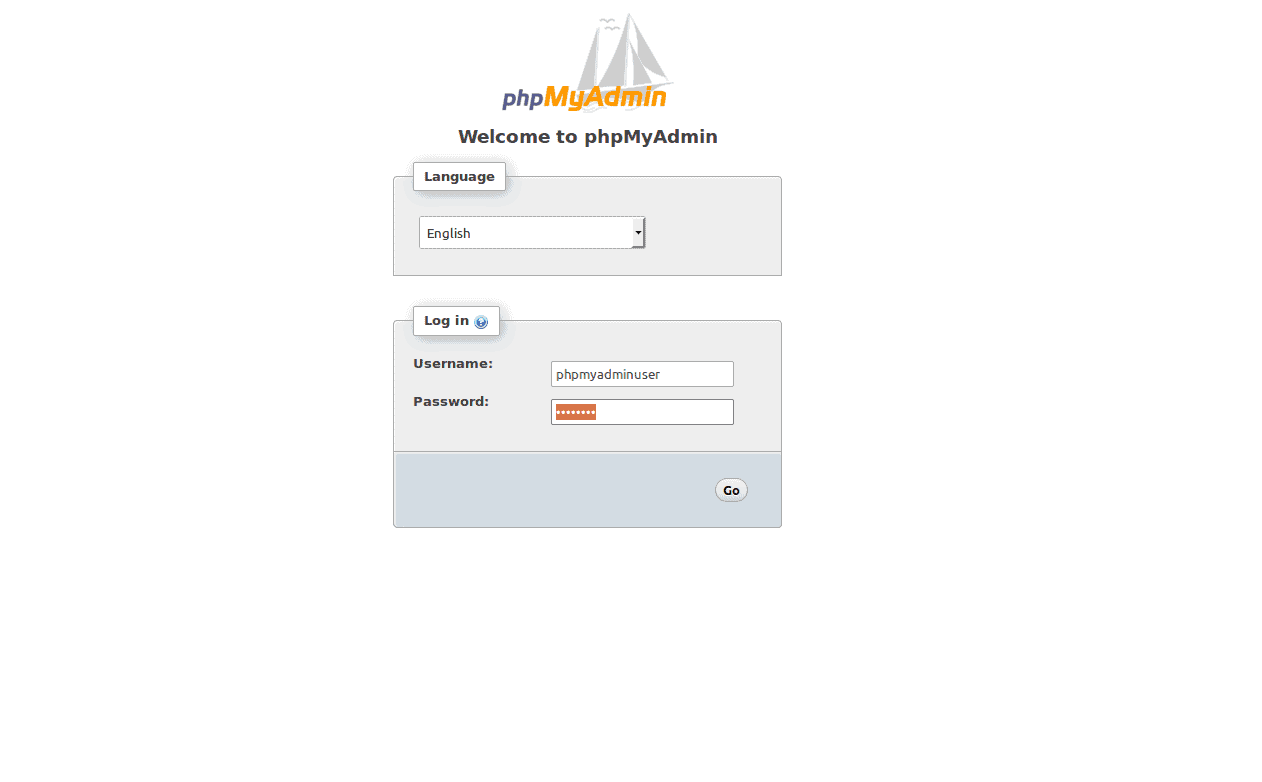
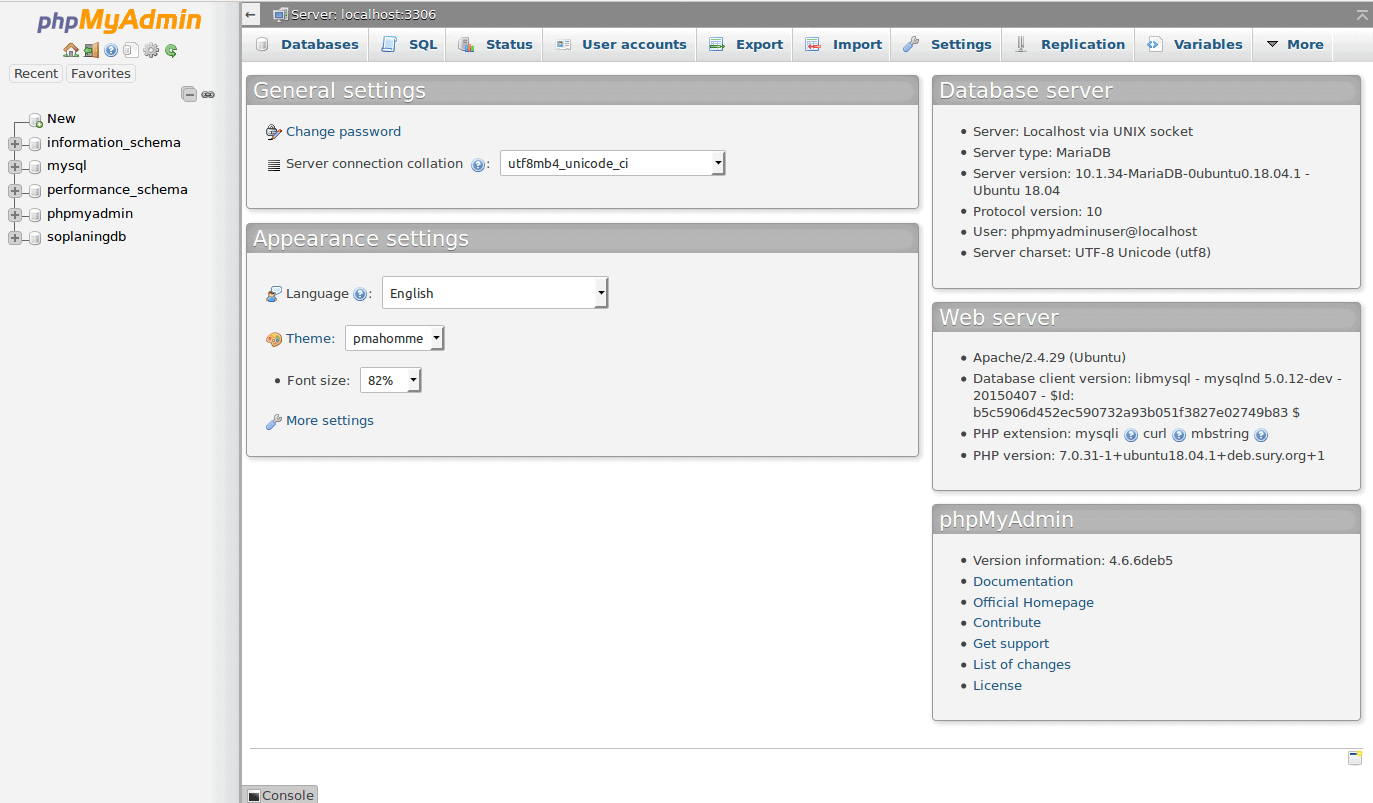
Provide your username / password and click on the Go button. You should see the phpMyAdmin dashboard in the following page:
Secure phpMyAdmin with .htaccess
Next, it is recommended to secure phpMyAdmin from unauthorized access. You can do it with the .htaccess file.
First, enable the use of .htaccess with the following command:
nano /etc/apache2/conf-available/phpmyadmin.conf
Change the following lines:
<Directory /usr/share/phpmyadmin/>

Options SymLinksIfOwnerMatch

DirectoryIndex index.php

AllowOverride All
Save and close the file. Then, create a .htaccess file inside phpmyadmin directory:
nano /usr/share/phpmyadmin/.htaccess
Add the following lines:
AuthType Basic

AuthName "Restricted Files"

AuthUserFile /etc/phpmyadmin/.htpasswd

Require valid-user
Save and close the file. Then, create a admin user with the following command:
htpasswd -c /etc/phpmyadmin/.htpasswd admin
You should see the following output:
New password:

Re-type new password:

Adding password for user admin
Now, restart your Apache service to apply all the changes with the following command:
systemctl restart apache2
Thats it. phpMyAdmin is now configured with two layer of authentication.
Now, open your web browser and type the URL http://your-server-ip/phpmyadmin. You will be asked to provide addition username and password as shown below:
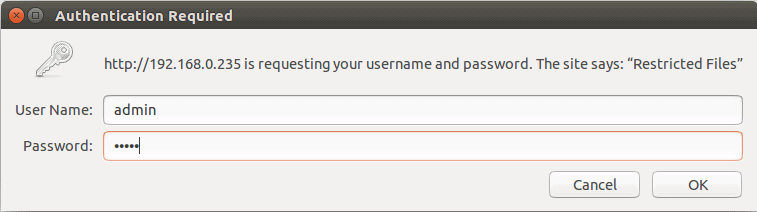
Provide your username and password which you have created earlier and click on the Log In button. You will be redirected to the regular phpMyAdmin authentication page.
Congratulations! you have successfully installed and secured phpMyAdmin with additional layer of authentication.