
Windows PowerShell Active Directory Module is most commonly used by system administrators to simplify the day-to-day tasks.
You can use the cmdlets of this module to manage domain users, groups, computers and perform some Active Directory management tasks. This tool also allows you can also manage the Active Directory from the member servers.
In this tutorial, we will show you how to install PowerShell Active Directory module on Windows 7, Windows 8, Windows 8.1, Windows 10, Windows Server 2012, Windows Server 2012 R2 and Windows Server 2016.
Install the PowerShell Module on Windows 8, 8.1 and 10
The PowerShell module is a part of the Remote Server Administration Tools (RSAT) in all Windows Desktop operating systems. This tool includes all the required command line utilities and Windows PowerShell modules to manage a Windows server.
Installing the PowerShell Module on Windows 8, 8.1 and 10 is easier than other Windows versions. You just need to download and install RSAT module from the following links:
PowerShell Module for Windows 8
PowerShell Module for Windows 8.1
PowerShell Module for Windows 10
After installing the RSAT tool, you shouldn’t need to do anything else, as the installation process will enable all tools by default.
Install the PowerShell Module on Windows 7
You can follow the below steps to install the PowerShell Module on Windows 7 machine, although Windows 7 is no longer supported, we’ll leave this section below for historical purposes – we all know there will be Windows 7 systems still in production due to upgrade issues.
1. Click here to download the RSAT tools for Windows 7 from Microsoft official website and then run the install.
2. Open the Control Panel => Programs and Features and click Turn Windows features on or off.
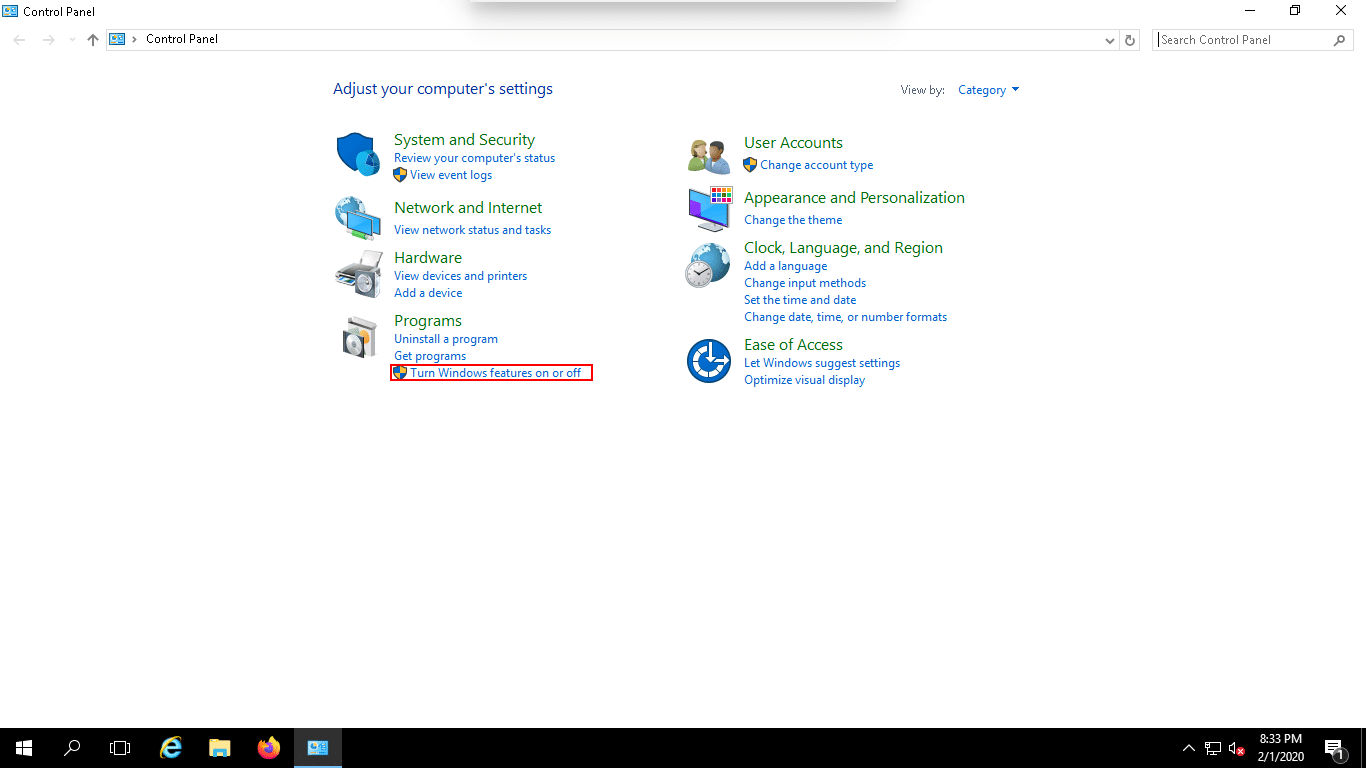
3. Click on the Remote Server Administration Tools > Role Administration Tools > AD DS and AD LDS Tools and enable the Active Directory Module for Windows PowerShell checkbox as seen in the image below.

4. Now Open PowerShell cmd prompt and run the following command to import the module:
Import-Module ActiveDirectory
Install the PowerShell Module on Windows Server 2012, 2012 R2 and 2016
The PowerShell module is installed as a separate feature in the Windows Server operating system. You can install the PowerShell Module from the Server Manager graphical console using the following steps below:
1. Open the Server Manager.
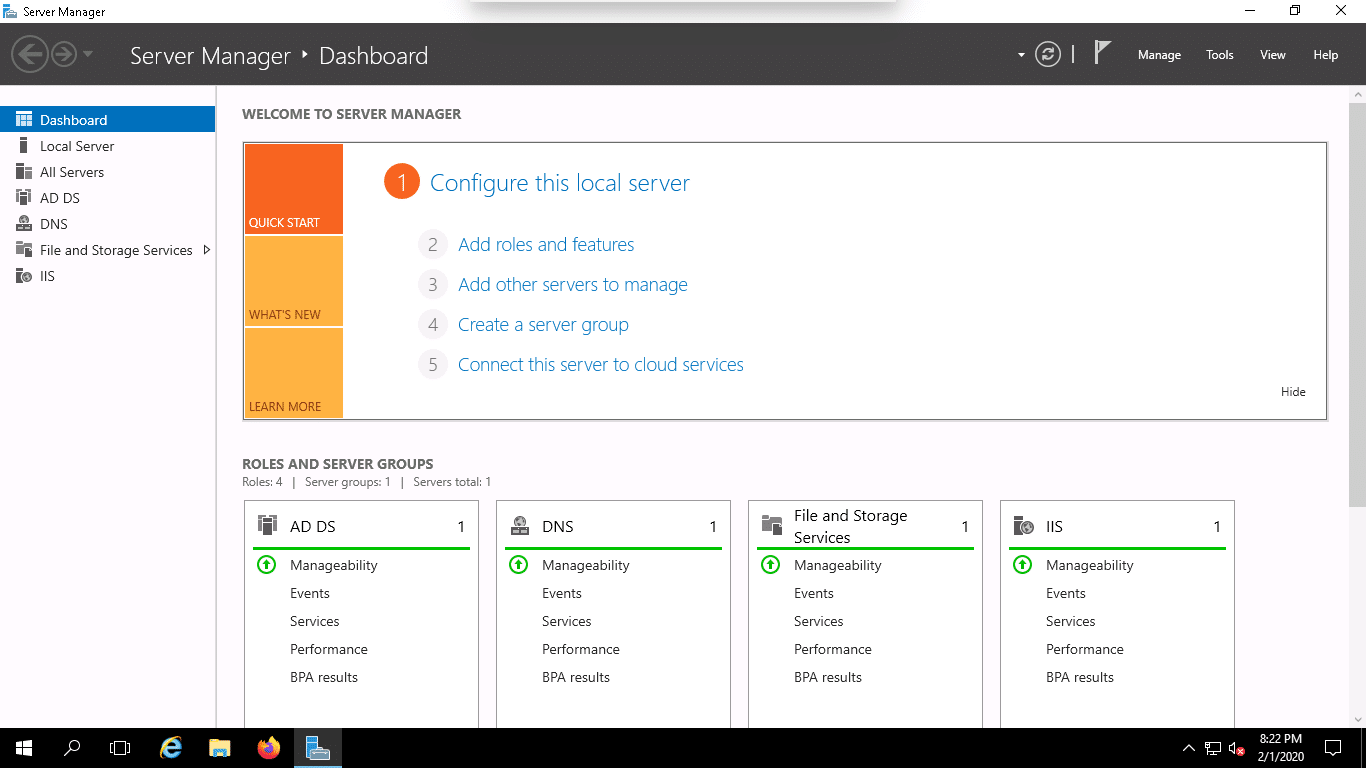
2. Click on the Add Roles and Features.
3. Click Next until you reach Features.
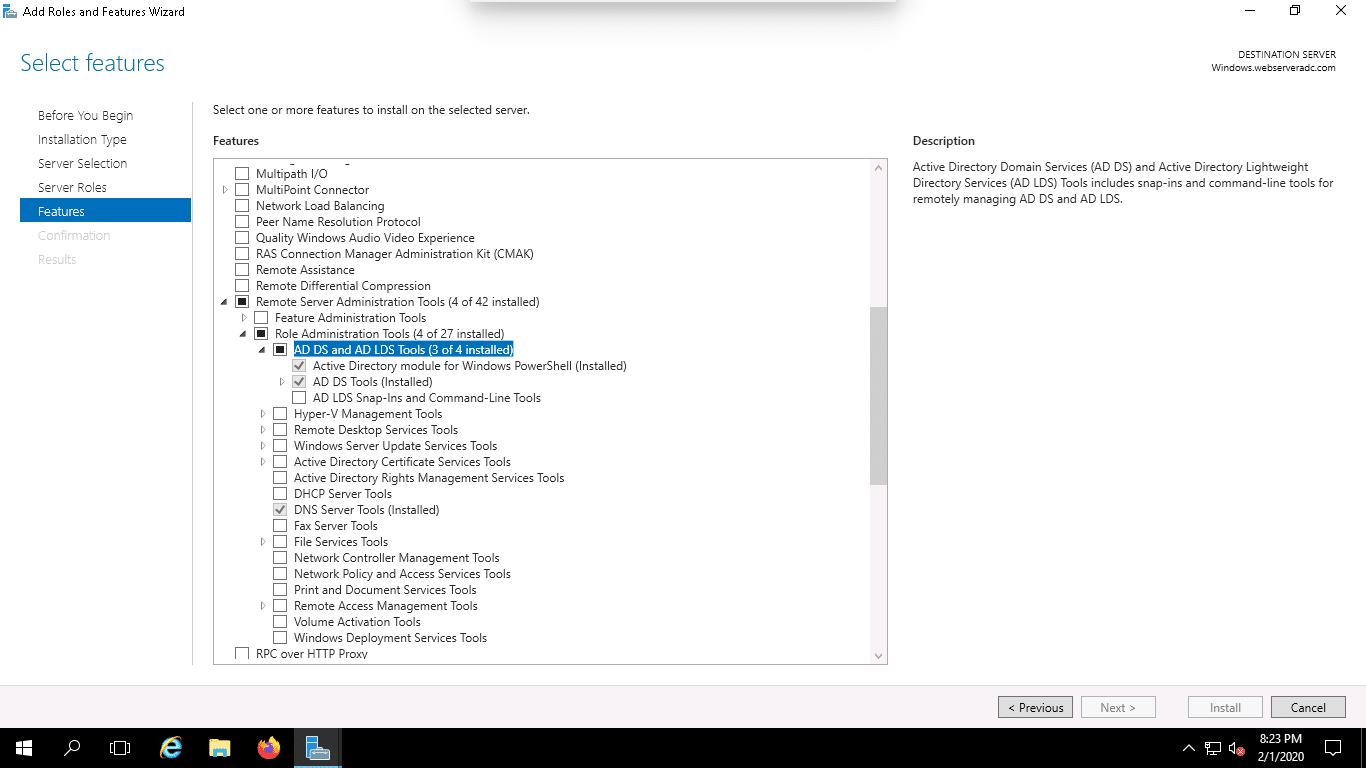
4. Click on the Remote Server Administration Tools > Role Administration Tools > AD DS and AD LDS Tools then enable the checkbox for Active Directory module for Windows PowerShell as seen in the image below.
5. Click on the Install button to install the PowerShell module.
Install via Powershell Command
You can also install the PowerShell module for Active Directory using the PowerShell command as shown below:
Add-WindowsFeature RSAT-AD-PowerShell
Then you can verify it with the Get-WindowsFeature cmdlet.
Get-WindowsFeature -Name RSAT-AD-PowerShell

Install the PowerShell Module on Windows Server 2008 R2
In Windows Server 2008 R2, the Active Directory module for Windows PowerShell is automatically installed on the Windows Server after you installed Active Directory Domain Services.
If you want to install the module on member servers follow the below steps:
1. Open the Server Manager.
2. Click on the Add Roles and Features.
3. Click Next until you reach Features.
4. Click on the Remote Server Administration Tools > Role Administration Tools > AD DS and AD LDS Tools then enable the checkbox for the Active Directory module for Windows PowerShell.
5. Click on the Install button to install the PowerShell module.
You can also install the module using the PowerShell Windows Server 2008 R2 as shown below:
Import-Module ServerManagerAdd-WindowsFeature RSAT-AD-PowerShell

Import-Module ActiveDirectory
Install the PowerShell Active Directory module on PowerShell Core 6.x
You can install the PowerShell Active Directory module on PowerShell Core 6.x on Windows by following the below steps:
1. Install RSAT tool in your Windows Operating system.
2. Install the WindowsCompatibility module in the PowerShell interface using the following command:
Install-Module -Name WindowsCompatibility
3. Import the WindowsCompatibility module using the following command:
Import-Module -Name WindowsCompatibility
4. Import the ActiveDirectory module using the following command:
Import-WinModule -Name ActiveDirectory
Using Automated Tools for Active Directory Management
An easier alternative to installing the PowerShell Active Directory Module is to use an automated tool like ManageEngine ADManager Plus. This provides unified visibility into your AD environments and makes it easy to manage AD users, groups, devices, and more – all without requiring PowerShell scripts. Its many features, like bulk user management, file permissions management, group policy management, password management, and M365 visibility, make it a good choice for organizations of all sizes that need better control and automation for their AD environments. A highlight is its intuitive UI that is ideal for users of all skills and backgrounds.
Download a 30-day free trial today.
Conclusion
In the above tutorial, you’ve learned how to install the Active Directory PowerShell module on different Windows operating systems, including Windows 7, 8, Server 2008, 2012 & 2016. We hope this will help simplify your Active Directory management tasks using Powershell and its powerful scripting features!